During my last semester at BITS I was working with Prof. Tiwari on indexing iris images. Unfortunately, given the short time frame, we could not complete the project, however here I would share some experiments I enjoyed performing.
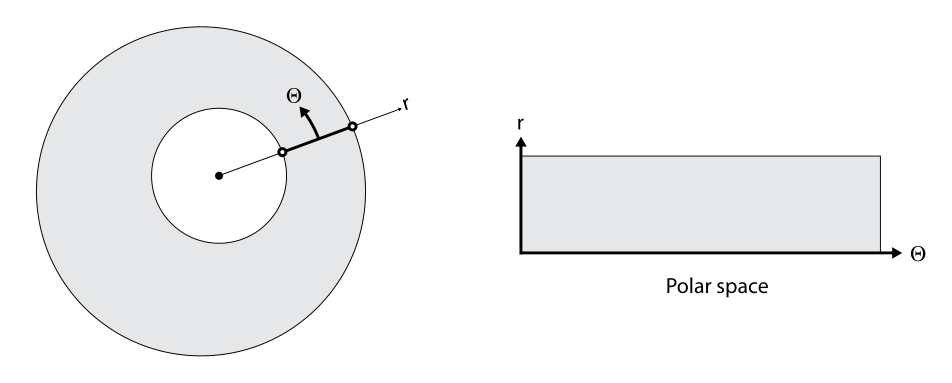
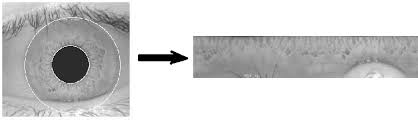
The traditional pre-processing pipeline for iris images includes two stages, segmentation and normalization with Daugman’s rubber sheet model.
What makes dealing with normalized iris images difficult is the horizontal translation which exists between the normalized samples of the same iris. Hom et al. use Fully Convolutional Network (FCN) to obtain a 2-D feature map and accounts for the translation at the matching time. But this approach has an O(n) time complexity making it less suitable for matching indexing of large database. We wanted to use dense features with a staged regression model as described by Kraska et al. for a possibility of O(1) lookup.
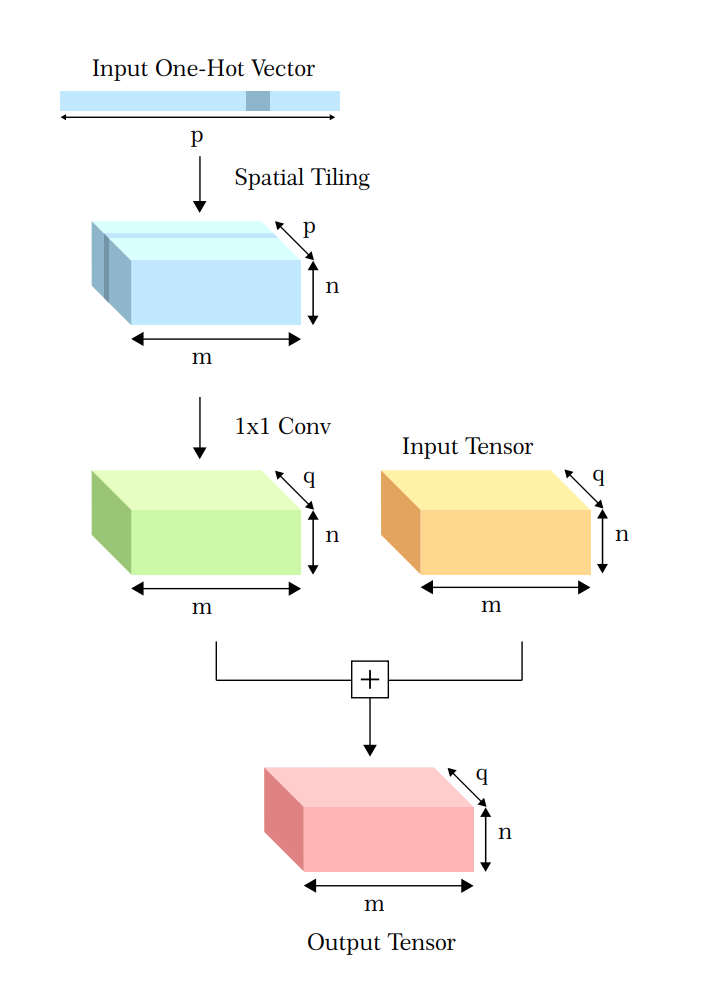
In their paper on robotic grasping Levin et al. add a motor command vector, a one-hot vector to an intermediate layer in CNN by tiling it to the same dimensions. I decided to use this cool trick to train an autoencoder like architecture to perform translation and hopefully learn some translation invariant features.
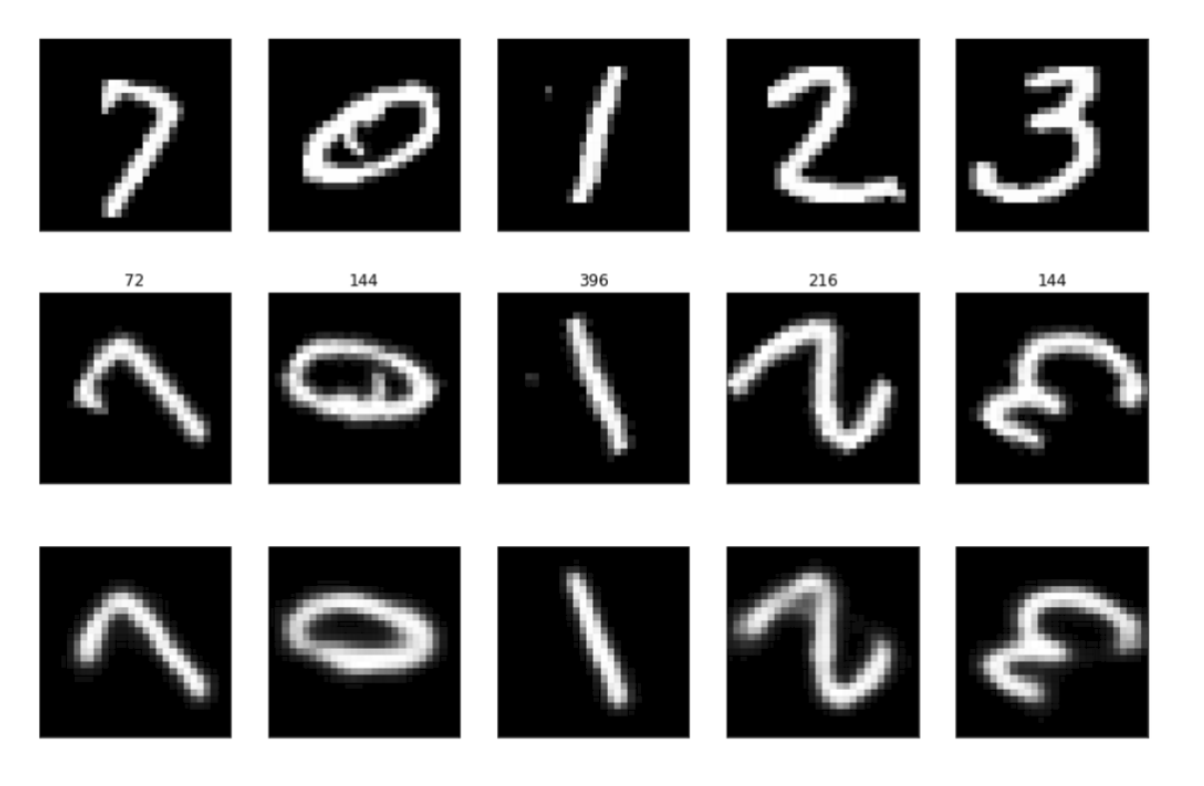
Before trying with the iris images I decided to verify if the technique could work on simpler dataset. So I did a couple of experiments with MNIST and Fashion-MNIST. We train the encoder in the standard way, however we pass an extra 14-D one-hot vector to the decoder which represents the number of pixels the image is supposed to be translated by. In case of MNIST since every image is 28x28 pixels, we allow shift in quantums of 2 pixels hence creating 14 different possible outcomes.
To prepare the training data we create five translated images with random corresponding every image in the MNIST train split.
def translate_data(X, number_of_samples=5):
    """
    Takes images from MNIST dataset as input
    and transforms them to create new to datset.

    :param X: (n, 28, 28) array containing original MNIST images
    :param number_of_samples: Number of samples to be generated from
                              each input image.
    :return: tuple of ((new_x, translation_vectors), new_y)
            new_x: (n * number_of_samples, 28, 28) array containing
                         images from the original datset.
            translation_vectors: (14,) one-hot array containing the amount
                                of translation applied to each corresponding
                                image in new_y
            new_y: (n * number_of_samples, 28, 28) array containing
                         translated images.
    """
    new_x = []
    new_y = []
    translation_vectors = []

    for i in range(X.shape[0]):
        for _ in range(number_of_samples):
            translation = np.random.randint(0, 14) * 2
            # Copy image to new_x as it is
            new_x.append(X[i])
            # Perform translation and add image to new_y
            new_y.append(
                np.hstack([X[i, :, translation:],
                           X[i, :, :translation]]))
            translation_vector = np.zeros(14)
            translation_vector[translation // 2] = 1
            translation_vectors.append(translation_vector)

    new_x, translation_vectors, new_y = np.asarray(new_x), \
                                        np.asarray(translation_vectors), \
                                        np.asarray(new_y)

    return ((new_x, translation_vectors), new_y)
We then define the encoder network as a simple CNN,
def get_encoded(input_img):
    """
    Defines the encoder network.
    :param input_image: A tensor containing input image
    :return: Tensor representing the encoded image
    """
    x = Conv2D(16, (3, 3), activation='relu', padding='same')(input_img)
    x = BatchNormalization()(x)
    x = MaxPooling2D((2, 2), padding='same')(x)
    x = Conv2D(14, (3, 3), activation='relu', padding='same')(x)
    x = MaxPooling2D((2, 2), padding='same')(x)
    x = Conv2D(14, (3, 3), activation='relu', padding='same')(x)
    x = BatchNormalization()(x)
    x = MaxPooling2D((2, 2), padding='same')(x)
    x = Conv2D(14, (3, 3), activation='relu', padding='same')(x)
    encoded = MaxPooling2D((2, 2), padding='same')(x)

    return encoded
Since defining the decoder all at once could be a mouthful we create a helper method which returns us the convolution and addition block.
def convolve_and_add(x, translation_vector_reshaped, image_dim, num_filters=14):
    """
    Defines the convolution and add block.
    :param x: Input tensor
    :param translation_vector_reshaped: Shape input reshaped as (1, 1, 14) tensor
    :param image_dim: The dimension of input tensor, assuming the
                      image hight and width are same
    :param num_filters: Number of filters in each convolution layer
    :return: Output tensor
    """
    #Sun
    get_tiling_lambda = lambda: Lambda(lambda x: K.tile(x, [1, image_dim, image_dim, 1]))

    x = Conv2D(num_filters, (3, 3), activation='relu', padding='same')(x)
    translation_vector_tiled = get_tiling_lambda()(translation_vector_reshaped)
    x = Add()([x, translation_vector_tiled])
    x = Conv2D(num_filters, (3, 3), activation='relu', padding='same')(x)
    translation_vector_tiled = get_tiling_lambda()(translation_vector_reshaped)
    x = Add()([x, translation_vector_tiled])
    x = Conv2D(num_filters, (3, 3), activation='relu', padding='same')(x)
    translation_vector_tiled = get_tiling_lambda()(translation_vector_reshaped)
    x = Add()([x, translation_vector_tiled])
    x = BatchNormalization()(x)

    return x
Then we define decoder network using convolve_and_add as,
def get_decoded(encoded, translation_vector):
    """
    Defines the decoder network.
    :param encoded: Tensor representing the encoded image
    :param translation_vector: One-hot vector representing the translation amount
    :return: Decoded image
    """
    translation_vector_reshaped = Reshape((1, 1, 14))(translation_vector)

    #### Block 1 ####
    # Convolution
    x = Conv2D(36, (3, 3), activation='relu', padding='same')(encoded)
    x = Conv2D(36, (3, 3), activation='relu', padding='same')(x)
    x = Conv2D(36, (3, 3), activation='relu', padding='same')(x)
    x = BatchNormalization()(x)
    # Upsample
    x = Conv2D(14, (3, 3), activation='relu', padding='same')(x)
    x = UpSampling2D((2, 2))(x)

    #### Block 2 ####
    # Convolve and Add
    x = convolve_and_add(x, translation_vector_reshaped, 4)
    # Upsample
    x = Conv2D(14, (3, 3), activation='relu', padding='same')(x)
    x = UpSampling2D((2, 2))(x)

    #### Block 3 ####
    # Convolve and Add
    x = convolve_and_add(x, translation_vector_reshaped, 8)
    # Upsample
    x = Conv2D(14, (3, 3), activation='relu', padding='same')(x)
    x = UpSampling2D((2, 2))(x)

    #### Block 4 ####
    # Convolve and Add
    x = convolve_and_add(x, translation_vector_reshaped, 16)
    # Upsample
    x = Conv2D(32, (3, 3), activation='relu')(x)
    x = UpSampling2D((2, 2))(x)

    #### Block 5 ####
    # Convolution
    x = Conv2D(32, (3, 3), activation='relu', padding='same')(x)
    x = Conv2D(32, (3, 3), activation='relu', padding='same')(x)
    x = Conv2D(32, (3, 3), activation='relu', padding='same')(x)

    decoded = Conv2D(1, (3, 3), activation='sigmoid', padding='same', name='last_conv')(x)

    return decoded
This gives in surprisingly neat results.
Then I decided to repeat the experiment but this time trying to rotate the digits.
Then as a harder benchmark I tried to train it on Fashion-MNIST. On the translation task we lose some details but it gets the outlines right for the most part. As our primary objective was translation, I did not repeat the experiment on rotation task.
The Google Colab notebook for the MNIST translation task is available here, where you can train the network with cloud GPUs. Though, ultimately I was unable to use the method on iris images, I thoroughly enjoyed performing these experiments.